

Owning your email server proves beneficial for medium-sized enterprises. It allows for centralized traffic control and rule customization, facilitating clear and efficient service management.
This guide demonstrates the installation and configuration of an Ubuntu mail server on a virtual private server also running Ubuntu. While there exist various alternatives and methods for setting up email servers on Linux, we’ll focus on this particular approach. Nevertheless, our focus will be on Postfix!
Setting up DNS for an Ubuntu Mail Server: Configuration Guide
Simply adhere to this comprehensive step-by-step guide, and you’ll encounter no difficulties while configuring the setup!
- Sign in and Upgrade Your Server (Utho): Access the Utho server via SSH. If you encounter any issues. Once logged in, proceed to update your system using the provided command:
| apt-get update |
- Install Bind: In order to set up a DNS server to work with Postfix, we require an additional tool – Bind. Let’s proceed with its installation:
| sudo apt install bind9 |
- Configure /var/cache/db.test: Now, it’s crucial to note that the IP address of our Ubuntu machine is 192.168.250.7. We need to substitute it with the IP address where the installation will take place. For this demonstration, we’ll utilize mail.test.com as a Fully Qualified Domain Name (FQDN). Next, we need to establish a new zone for our example. To achieve this, create a new file containing the zone information.
| sudo nano /var/cache/bind/db.test |
Subsequently, include the following:
| $ORIGIN test.com. $TTL 1D @ IN SOA ns1 root( 1 ;serial 1D ;refresh 2H ;retry 2W ;expire 5H ;minimum ); @ IN NS ns1 ns1 IN A 192.168.250.7 mail IN A 192.168.250.7 @ IN MX 5 mail |
Keep in mind, it’s imperative to replace the IP address with that of your server (Utho) and modify the domain to your preferred one. Press CTRL+O to save the alterations and CTRL+X to exit the nano editor.
4. Add New Zone to Bind Configuration: Prior to enabling the newly created zone, it’s essential to review the configuration of the file.
| sudo named-checkzone test.com. /var/cache/bind/db.test |
We can now append our new zone to the Bind zone configuration file. Execute the following command:
| sudo nano /etc/bind/named.conf.default-zones |
Then, insert the new zone:
| zone “test.com.” { type master; file “db.test”;}; |
Once more, press CTRL+O to save the modifications and CTRL+X to exit.
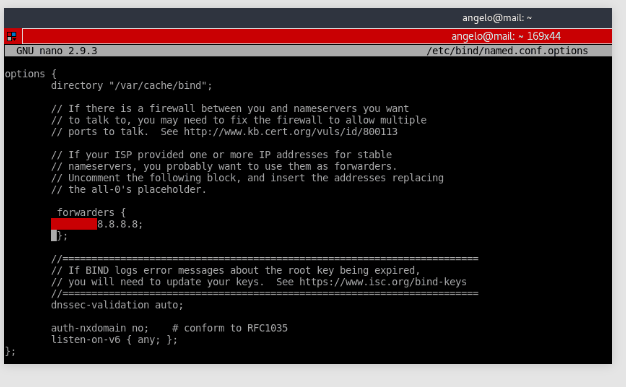
5. Configure /etc/bind/named.conf.options: In the file /etc/bind/named.conf.options, you need to uncomment the forwarders line and incorporate the Google DNS – 8.8.8.8. Simply remove the // symbols, as illustrated in the screenshot below.
| sudo nano /etc/bind/named.conf.options |
6. Restart Bind: Now, it’s time to restart the bind9 service. You can achieve this using one of two commands:
| sudo systemctl reload bind9 |
Or
| sudo systemctl restart bind9 |
Installing and Setting Up a Mail Server on Ubuntu: Complete Guide
We’re nearly finished, your Ubuntu email server is almost ready to go live. Here’s what you need to do next:
- Install Postfix Email Server: Next, let’s install Postfix. Postfix is a fast and open-source email server written in C. Use the following command to install it:
| sudo apt install postfix |
During installation, you’ll be prompted to configure the package. Select ‘Internet Site’ on the first screen.
Next, enter the server name, which in this case is test.com.
While Postfix offers extensive configuration options, for this tutorial, we’ll stick with the default settings.
2. Add user: Afterwards, we need to include our user in the ‘mail’ group:
| sudo usermod -aG mail $(whoami) |
After that, we need to create the users and include them in the mail group to enable them to send and receive mail. Let’s add Gabriel as an example:
| sudo useradd -m -G mail -s /bin/bash/ gabriel |
Afterwards, we must assign a password to the newly created user:
| sudo passwd gabriel |
3. Test the Ubuntu Mail Server: Now, let’s confirm our setup by sending and receiving an email from the terminal. To do this, we’ll install the mailutils package:
| sudo apt install mailutils |
Then, we’ll send an email to the other user’s email account, named Gabriel. Type in the subject and message. Once done, press CTRL+D to finish. Begin composing the email with the following command:
| mail [email protected] |
Now, let’s log into another user account and check the mail utility. After running the ‘mail’ command, we’ll find the email we just sent to the other test user. To access the email, simply enter the number assigned to the mail, such as 1.
To test outbound emails from this user, try sending to another email address:
| mail [email protected] |
That’s all! You’re now able to send emails from your own email server on Ubuntu.
Setting up an email server is relatively straightforward, yet its management can pose some complexity. Linux is often preferred for this task due to its robust security features and efficient resource management.
For larger enterprises, having a pre-configured and fully functional email server solution like Utho’s can prove immensely beneficial. Alternatively, hosting your own email server grants you complete control over the service.
Enhancing and sustaining an email server involves continuous refinement and adaptation, constituting a dynamic and time-intensive process.