Add Scaling Schedule
How to Add Scaling Schedule
Overview
The Scaling Schedule feature allows you to define a recurring schedule to scale your auto scaling instance based on your desired configuration. This helps you automate scaling actions at specific times, improving cost-efficiency and performance.
Login or Sign Up
- Visit the Utho Cloud Platform login page.
- Enter your credentials and click Login.
- If you’re not registered, sign up here.
Steps to Add a Scaling Schedule
- Navigate to the Auto Scaling Listing Page
- Navigate to the Auto Scaling listing page in your account, or click here to directly access it.
- Select the Desired Auto Scaling Instance
- Find the auto scaling instance you want to configure and click the Manage button next to it.
- Locate the Scaling Schedules Section
In the Manage page, scroll down and look for the Scaling Schedules section, where you can see a list of all scaling schedules that have been added to the selected auto scaling instance.

- Click on the “Add New” Button
At the top of the scaling schedules list, click on the Add New button to create a new scaling schedule.

- Configure the New Scaling Schedule
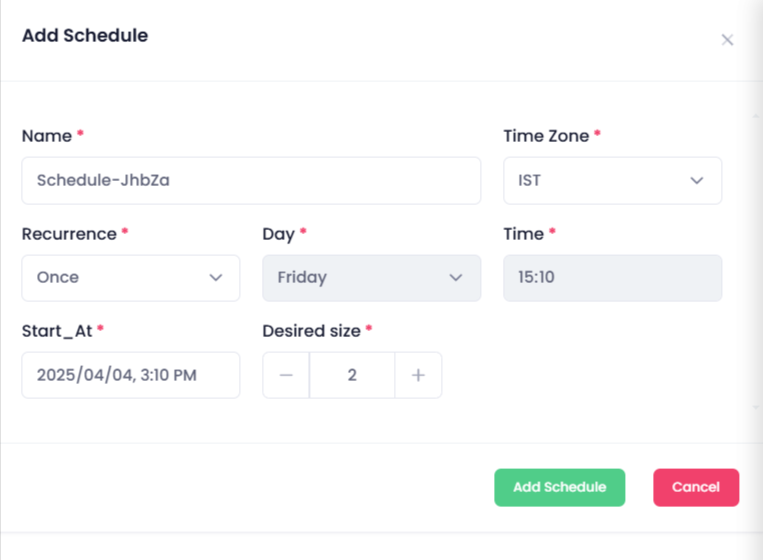
- A drawer will open where you need to fill in the following details:
Name : Provide a unique name for the scaling schedule.
Desired Size : Enter the number of instances you want to maintain during the scheduled time (minimum 1).
Time Zone : Select the time zone for the scaling schedule (e.g., IST, UTC).
Recurrence : Choose how often the scaling action should repeat (e.g., Every 5 minutes, Every 30 minutes, Every 1 hour).
Day : Select the specific day for the scaling action (fixed to today’s date). If the recurrence is set to weekly, you can select a different day.
Time : Set the exact time for the scaling action to trigger (fixed to the current time). If recurrence is changed to every day or week, you can modify this.
Start At : Define the exact start date and time for the schedule.

- A drawer will open where you need to fill in the following details:
- Click on the “Add Schedule” Button
- After entering the information, click on the Add Schedule button to finalize the scaling schedule.
- Verify the New Scaling Schedule
Once the scaling schedule is added, a success message will appear. You can verify the new schedule by checking the list of scaling schedules in the Scaling Schedules section. If your schedule is reflected, it has been successfully added.

Impact of Adding a Scaling Schedule
- Automated Scaling : The scaling schedule automates scaling actions based on a predefined time, ensuring that resources are adjusted according to traffic patterns.
- Cost Optimization : You can avoid running unnecessary resources during low-traffic hours, thus optimizing your costs.