The ability to seamlessly access and manage data across multiple devices is essential. Utho's Object Storage provides a dependable solution for storing and organizing your files in the cloud. With the convenience of accessing these files directly from your smartphone, you can stay productive on the go. Follow this guide to link Utho's Object Storage to your phone, making file access and management easy from anywhere.
Creating a Bucket on Utho's Platform
Step 1: Begin by creating a bucket on Utho's platform.
Step 2: Then, proceed to create a bucket and select the "Create Bucket" option.
During the creation process, choose the Delhi/Noida data center and assign a name to your bucket as per your preference.
Following that, you'll have a bucket at your disposal.
Generating Access Keys for Bucket Access
Step 5: Subsequently, return to the object storage section and generate access keys to enable access to your bucket.
Step 6: Then, provide a name and proceed to create the access key.
After creating the access keys, you will have two keys: a secret key and an access key. Please ensure to copy both keys securely, as they will not be visible again.
Managing Access Control and Permissions
Step 3: Then, proceed to click on the "Manage" option.
Step 4: Next, navigate to the "Access Control" section and grant permissions for uploading as either public or private according to your preference. Choose the "Upload" option accordingly.
Updating Permissions for Object Storage Access
Step 7: Next, navigate to the "Manage" option under Object Storage, select "Permissions," and proceed to update the permissions as necessary.
Step 8: Proceed by selecting the access keys, then update the read/write permissions accordingly.
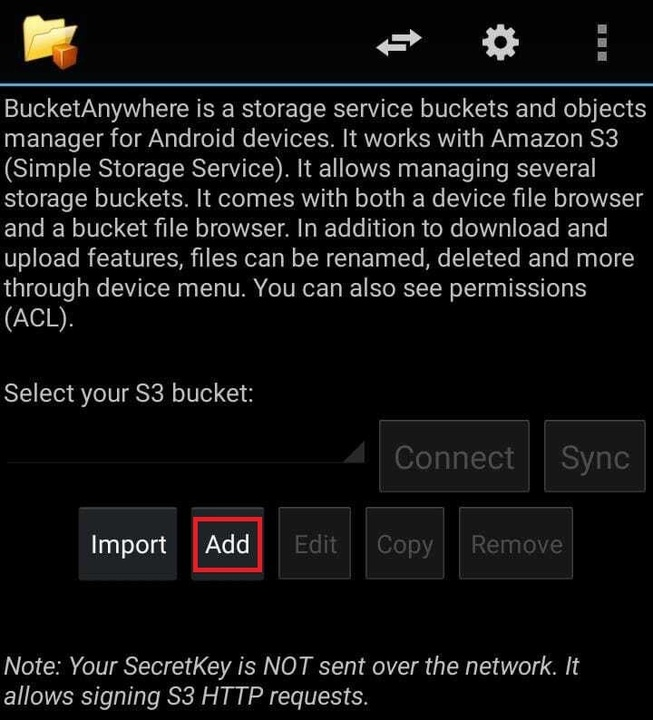
Installing and Adding “Bucket Anywhere” Application
Step 9: Get the "Bucket Anywhere" app on your phone from the Android Play Store.
Step 10: Open the application and proceed to click on the "Add" option.
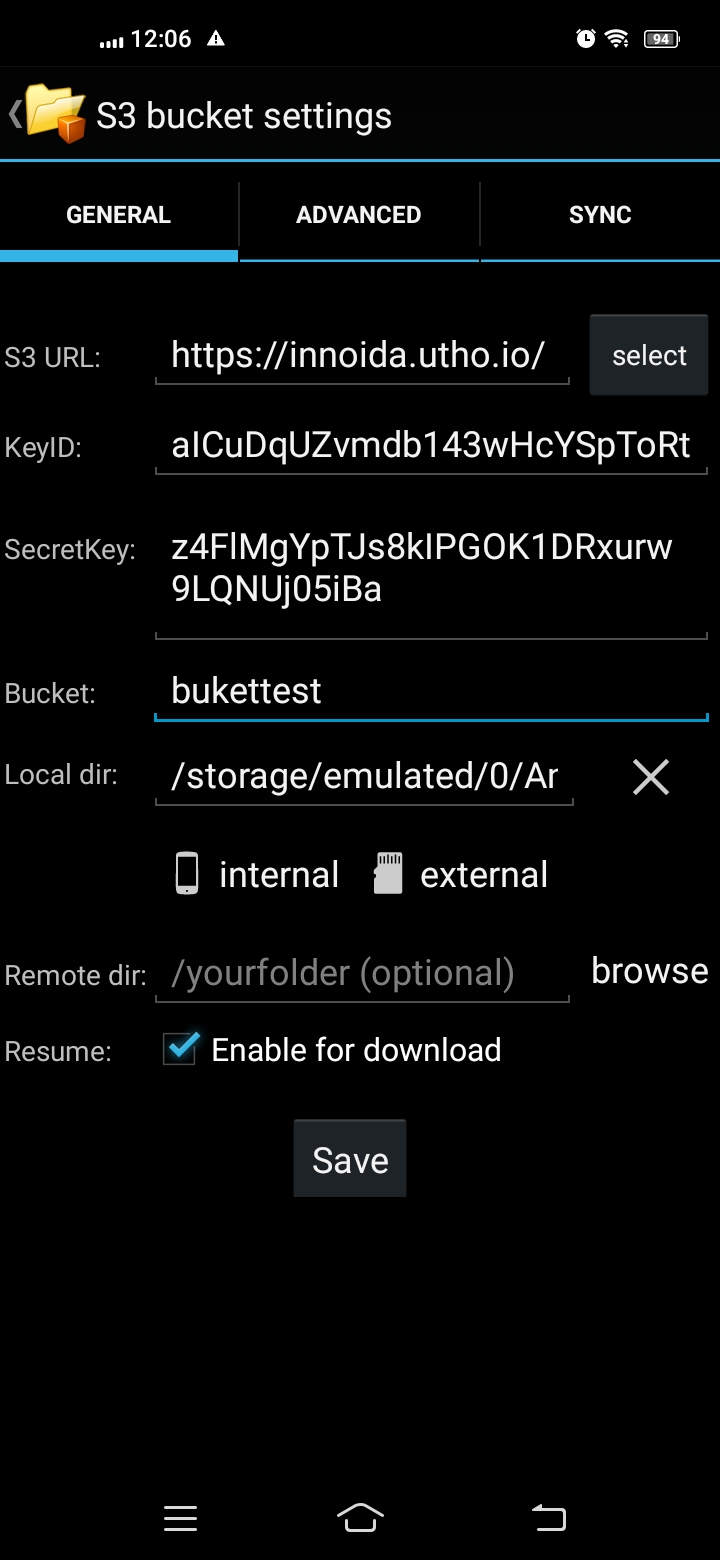
Configuring Connection Details and Uploading Files
Step 11: Fill in the following information: S3 URL - "https://innoida.utho.io/", access key, secret access key, and ensure the bucket URL aligns with the details provided when creating Access keys.
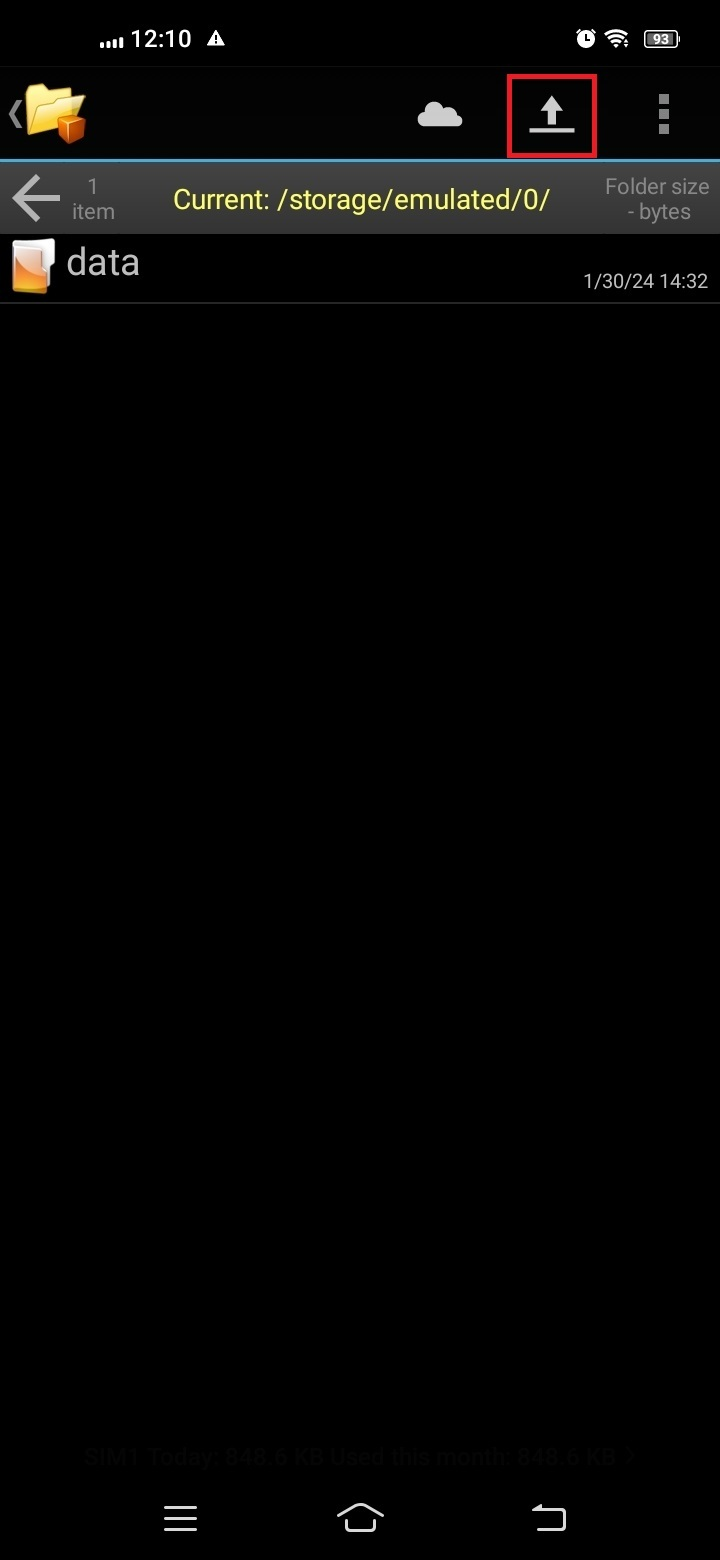
Step 12: Click on "Save" and proceed to upload the files and folders. Select the files you from wish to upload, then initiate the upload process
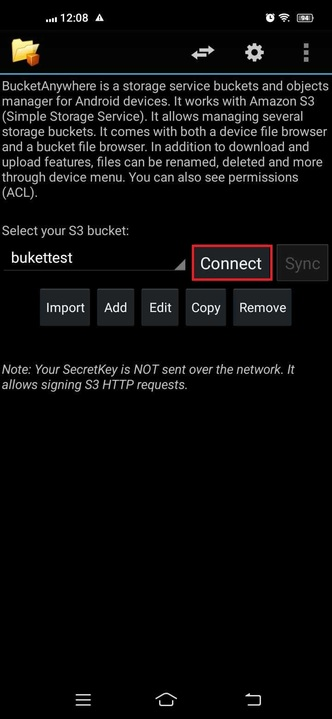
Step: 14 We will connect it to the connect option.
Finally, You've successfully connected to your Utho's bucket. Now, you can effortlessly access and manage your files from anywhere. If you have any questions, feel free to ask. Enjoy easy access to your files wherever you are.
Let's Encrypt offers SSL certificates at no cost, enabling secure connections for your websites. Certbot, a free and open-source tool, simplifies the process of generating Let's Encrypt SSL certificates on your unmanaged Linux server. To get started, log into SSH as root.
Install Certbot in Ubuntu 20.04
Certbot now suggests using the snapd package manager for installing on Ubuntu, Instead Python Installs Packages (PIP) is a suitable alternative.
Install Certbot in Ubuntu with PIP
Ubuntu users of cloud servers have the option to install Certbot using PIP
Snapd is available for use by Dedicated Server Hosting users
Set up snapd:
sudo apt install snapd
Verify that you have the latest version of snapd installed:
sudo snap install core; sudo snap refresh core
Installing Certbot using snapd:
sudo snap install --classic certbot
Establish a symlink to guarantee Certbot's operation:
sudo ln -s /snap/bin/certbot /usr/bin/certbot
Generate an SSL certificate using Certbot
Execute Certbot to generate SSL certificates and adjust your web server configuration file to redirect HTTP requests to HTTPS automatically. Alternatively, include "certonly" to create SSL certificates without altering system files, which is recommended for staging sites not intended for forced SSL usage.
Step 1: Select the most suitable option based on your requirements.
Generate SSL certificates for all domains and set up redirects in the web server configuration.
sudo certbot --utho
sudo certbot --nginx
Generate SSL certificates for a specified domain, which is recommended if you're utilizing your system hostname
Step 2: Provide an email address for renewal and security notifications.
Step 3: Accept the terms of service.
Step 4: Decide if you wish to receive emails from EFF.
Step 5: If prompted, select whether to redirect HTTP traffic to HTTPS: Option 1 for no redirect and no additional server changes, or Option 2 to redirect all HTTP requests to HTTPS.
SSL Maintenance and Troubleshooting Once you've installed a Let’s Encrypt certificate on your Ubuntu Certbot setup, you can check your website's SSL status at https://WhyNoPadlock.com. This will help you detect any mixed content errors.
The certificate files for each domain are stored in:
cd /etc/letsencrypt/live
Let’s Encrypt certificates have a lifespan of 90 days. To avoid expiration, Certbot automatically monitors SSL status twice daily and renews certificates expiring within thirty days. You can review settings using Systemd or cron.d.
systemctl show certbot.timer
cat /etc/cron.d/certbot
Verify that the renewal process functions correctly:
sudo certbot renew --dry-run
Simply having an SSL certificate and implementing 301 redirects to enforce HTTPS may not always suffice to thwart hacks. Cyber attackers have devised methods to circumvent both security measures, potentially compromising server communications.
HTTP Strict Transport Security (HSTS) is a security HTTP header designed to counteract this by instructing web browsers to serve your website only when a valid SSL certificate is received. If the browser encounters an insecure connection, it outright rejects the data, safeguarding the user.
Configuring HSTS within your web server, is straightforward and enhances security significantly.
UFW, short for Uncomplicated Firewall, offers a streamlined approach to managing firewalls, abstracting the intricacies of underlying packet filtering technologies like iptables and nftables. If you're venturing into network security and unsure about the tool to employ, UFW could be the ideal solution for you.
In this guide, you'll learn how to establish a firewall using UFW on Ubuntu 20.04.
Prerequisites
A single Ubuntu 20.04 server with a non-root user granted sudo privileges.
UFW comes pre-installed on Ubuntu by default. However, if it has been removed for any reason, you can reinstall it using the command: sudo apt install ufw.
Step 1: Enabling IPv6 Support in UFW (Optional)
While this tutorial primarily focuses on IPv4, it is also applicable to IPv6 if enabled. If your Ubuntu server utilizes IPv6, it's essential to configure UFW to handle IPv6 firewall rules alongside IPv4. To achieve this, access the UFW configuration using nano or your preferred text editor.
sudo nano /etc/default/ufw
Next, verify that the value of IPV6 is set to "yes." It should appear as follows:
/etc/default/ufw excerpt
IPV6= yes
After making the change, save and close the file. With this configuration, when UFW is enabled, it will be set to manage both IPv4 and IPv6 firewall rules. However, before activating UFW, it's crucial to ensure that your firewall permits SSH connections. Let's begin by establishing the default policies.
Step 2: Configuring Default Policies
If you're new to configuring your firewall, it's essential to establish your default policies first. These policies dictate how to manage traffic that doesn't specifically match any other rules. By default, UFW is configured to deny all incoming connections and allow all outgoing connections. Essentially, this setup prevents external connections to your server while permitting applications within the server to access the internet.
To ensure you can follow along with this tutorial, let's revert your UFW rules back to their default settings. Execute the following commands to set the defaults used by UFW:
Executing these commands will establish default settings to deny incoming connections and allow outgoing connections. While these firewall defaults might be adequate for a personal computer, servers typically require the ability to respond to incoming requests from external users. We'll explore how to address this next.
Step 3: Permitting SSH Connections
Enabling our UFW firewall at this point would result in denying all incoming connections. Therefore, we must establish rules that explicitly permit legitimate incoming connections, such as SSH or HTTP connections, if we want our server to respond to those requests. Particularly, if you're using a cloud server, allowing incoming SSH connections is essential for connecting to and managing your server.
To configure your server to allow incoming SSH connections, you can utilize the following command:
sudo ufw allow ssh
This command will establish firewall rules permitting all connections on port 22, the default port for the SSH daemon. UFW recognizes "ssh" as a service due to its listing in the /etc/services file.
Alternatively, we can define an equivalent rule by specifying the port rather than the service name. For instance, the following command achieves the same outcome as the previous one:
sudo ufw allow 22
If you've configured your SSH daemon to utilize a different port, you'll need to specify the correct port accordingly. For instance, if your SSH server listens on port 2222, you can execute this command to permit connections on that port:
sudo ufw allow 2222
With your firewall now set up to allow incoming SSH connections, you can proceed to enable it.
Step 4: Activating UFW
To activate UFW, execute the following command:
sudo ufw enable
could potentially disrupt existing SSH connections. Since we've already established a firewall rule permitting SSH connections, it should be safe to proceed. Respond to the prompt with 'y' and press ENTER.
Once enabled, the firewall becomes active. To inspect the set rules, run the command sudo ufw status verbose. Subsequent sections of this tutorial delve into utilizing UFW in greater depth, including allowing or denying various types of connections.
Step 5: Permitting Additional Connections
Now, it's time to enable the other connections that your server needs to respond to. The specific connections to allow will vary based on your requirements. Fortunately, you're already familiar with creating rules to permit connections based on service name or port; we've already done this for SSH on port 22. You can also employ this approach for:
To permit HTTP traffic on port 80, the standard port for unencrypted web servers, you can execute either of the following commands:
sudo ufw allow http
sudo ufw allow 80
To enable HTTPS traffic on port 443, which encrypted web servers typically use, you can utilize the following command:
sudo ufw allow https
sudo ufw allow 443
In addition to specifying a port or known service, there are several other methods to permit other connections.
Specific Port Ranges
You can define port ranges with UFW. Certain applications utilize multiple ports instead of a single port.
For instance, to permit X11 connections, which operate on ports 6000-6007, you can employ these commands:
When defining port ranges with UFW, it's essential to specify the protocol (tcp or udp) that the rules should apply to. We didn't highlight this before because not mentioning the protocol automatically allows both protocols, which is generally fine in most cases.
Specific IP Addresses
In UFW, you have the option to specify IP addresses as well. For instance, if you wish to allow connections from a particular IP address, such as a workplace or home IP address like 203.0.113.4, you would need to specify "from" followed by the IP address:
sudo ufw allow from 203.0.113.4
You can also define a specific port to which the IP address is permitted to connect by appending "to" followed by the port number. For instance, if you wish to enable connection from 203.0.113.4 to port 22 (SSH), you would execute the following command:
sudo ufw allow from 202.0.114.0/24 to any port 22
Subnets
If you aim to permit a subnet of IP addresses, you can achieve this using CIDR notation to specify a netmask. For instance, if you intend to allow all IP addresses ranging from 203.0.113.1 to 203.0.113.254, you could execute the following command:
sudo ufw allow from 202.0.114.0/24
Similarly, you can allow connections from the subnet 202.0.114.0/24 to a specific destination port. For example, to allow SSH (port 22) access, use this command: sudo ufw allow from 202.0.114.0/24 to any port 22
sudo ufw allow from 202.0.114.0/24 to any port 22
Managing connections to a specific network interface
To create a firewall rule that exclusively applies to a designated network interface, you can specify "allow in on" followed by the name of the network interface.
Before proceeding, you might need to check your network interfaces. You can achieve this with the following command:
ip addr
Output Excerpt 2: eth0: <BROADCAST,MULTICAST,UP,LOWER_UP> mtu 1500 qdisc pfifo_fast state . . . 3: eth1: <BROADCAST,MULTICAST> mtu 1500 qdisc noop state DOWN group default . . .
The highlighted output displays the network interface names, which are commonly named something similar to eth0 or enp3s2.
For example, if your server has a public network interface called eth0, you can allow HTTP traffic (port 80) to it with this command:
sudo ufw allow in on eth0 to any port 80
By doing so, your server would be able to accept HTTP requests from the public internet.
If you want your MySQL database server (port 3306) to only accept connections on the private network interface eth1, you can use this command:
sudo ufw allow in on eth1 to any port 3306
Enabling this setting allows servers on your private network to connect to your MySQL database.
Your firewall is now set up to allow, at the very least, SSH connections. Ensure to permit any additional incoming connections necessary for your server's functionality while restricting any unnecessary connections. This approach will ensure your server remains both functional and secure.
Monitoring network connectivity is a crucial aspect of server administration. Within this realm, there are several straightforward yet invaluable tools to employ. This guide will explore the utilization of traceroute for pinpointing network issues and introduce mtr, a utility amalgamating ping and traceroute functionalities within a single interface.
Using Traceroute: A Comprehensive Guide
Traceroute Simplified: Navigating the Path to Remote Servers
Traceroute serves as a straightforward tool for unveiling the pathway to a remote server, whether it's a website you're attempting to access or a printer on your local network. With the traceroute program pre-installed on nearly every Linux distribution by default, there's typically no need for additional installations. Simply call it by providing the website or IP address you wish to explore.
$ traceroute google.com
You will be provided with output resembling the following:
Output
traceroute to google.com (173.194.38.137), 30 hops max, 60 byte packets
1 192.241.160.253 (192.241.160.253) 0.564 ms 0.539 ms 0.525 ms
2 192.241.164.241 (192.241.164.241) 0.487 ms 0.435 ms 0.461 ms
3 xe-3-0-6.ar2.nyc3.us.nlayer.net (69.31.95.133) 1.801 ms 1.802 ms 1.762 ms
4 144.223.28.73 (144.223.28.73) 0.583 ms 0.562 ms 0.550 ms
5 144.232.1.21 (144.232.1.21) 1.044 ms 1.048 ms 1.036 ms
6 74.125.49.212 (74.125.49.212) 0.494 ms 0.688 ms 0.643 ms
7 209.85.248.180 (209.85.248.180) 0.650 ms 209.85.248.178 (209.85.248.178) 0.621 ms 0.625 ms
8 72.14.236.208 (72.14.236.208) 0.618 ms 72.14.236.206 (72.14.236.206) 0.898 ms 72.14.236.208 (72.14.236.208) 0.872 ms
9 72.14.239.93 (72.14.239.93) 7.478 ms 7.989 ms 7.466 ms
10 72.14.232.73 (72.14.232.73) 20.002 ms 19.969 ms 19.975 ms
11 209.85.248.228 (209.85.248.228) 30.490 ms 72.14.238.106 (72.14.238.106) 34.463 ms 209.85.248.228 (209.85.248.228) 30.707 ms
12 216.239.46.54 (216.239.46.54) 42.502 ms 42.507 ms 42.487 ms
13 216.239.46.159 (216.239.46.159) 76.578 ms 74.585 ms 74.617 ms
14 209.85.250.126 (209.85.250.126) 80.625 ms 80.584 ms 78.514 ms
15 72.14.238.131 (72.14.238.131) 80.287 ms 80.560 ms 78.842 ms
16 209.85.250.228 (209.85.250.228) 171.997 ms 173.668 ms 170.068 ms
17 66.249.94.93 (66.249.94.93) 238.133 ms 235.851 ms 235.479 ms
18 72.14.233.79 (72.14.233.79) 233.639 ms 239.147 ms 233.707 ms
19 sin04s01-in-f9.1e100.net (173.194.38.137) 236.241 ms 235.608 ms 236.843 ms
The initial line provides information regarding the conditions under which traceroute operates:
It indicates the specified host and the corresponding IP address retrieved from DNS for the domain, along with the maximum number of hops to examine and the packet size to be utilized.
The maximum number of hops can be modified using the -m flag. If the destination host is situated beyond 30 hops, you may need to specify a larger value. The maximum allowable setting is 255.
$ traceroute -m 255 obiwan.scrye.net
To modify the packet size sent to each hop, specify the desired integer after the hostname:
$ traceroute google.com 70
The output will appear as follows:
Output
traceroute to google.com (173.194.38.128), 30 hops max, 70 byte packets
1 192.241.160.254 (192.241.160.254) 0.364 ms 0.330 ms 0.319 ms
2 192.241.164.237 (192.241.164.237) 0.284 ms 0.343 ms 0.321 ms
Following the initial line, each subsequent line signifies a "hop" or intermediate host that your traffic traverses to reach the specified computer host. Each line adheres to the following format:
3 nyk-b6-link.telia.net (62.115.35.101) 0.311 ms 0.302 ms 0.293 ms
Below is the breakdown of each field:
hop_number: Represents the sequential count of the degree of separation between the host and your computer. Higher numbers indicate that traffic from these hosts must traverse more computers to reach its destination.
host_name: Contains the result of a reverse DNS lookup on the host's IP address, if available. If no information is returned, the IP address itself is displayed.
IP_address: Displays the IP address of the network hop.
packet_round_trip_times: Provides the round-trip times for packets sent to the host and back. By default, three packets are sent to each host, and the round-trip times for each attempt are appended to the end of the line.
To alter the number of packets tested against each host, you can indicate a specific number using the -q option, as demonstrated below:
$ traceroute -q1 google.com
To expedite the trace by skipping the reverse DNS lookup, you can utilize the -n flag as shown:
$ traceroute -n google.com
The output will resemble the following:
Output
traceroute to google.com (74.125.235.7), 30 hops max, 60 byte packets
1 192.241.160.253 0.626 ms 0.598 ms 0.588 ms
2 192.241.164.241 2.821 ms 2.743 ms 2.819 ms
3 69.31.95.133 1.470 ms 1.473 ms 1.525 ms
If your traceroute displays asterisks (*), it indicates an issue with the route to the host.
Output ... 15 209.85.248.220 (209.85.248.220) 121.809 ms 72.14.239.12 (72.14.239.12) 76.941 ms
209.85.248.220 (209.85.248.220) 78.946 ms
16 72.14.239.247 (72.14.239.247) 101.001 ms 92.478 ms 92.448 ms
17 * * 209.85.250.124 (209.85.250.124) 175.083 ms
18 * * *
19 * * *
What Signifies a Routing Problem?
Encountering a halt in your traceroute at a specific hop or node, indicative of an inability to find a route to the host, signifies a problem. Pinpointing the exact location of the networking issue isn't always straightforward. While the failed hop might seem the likely culprit, the complexity arises from the nature of round-trip packet pings and potential disparities in packet pathways. The issue could potentially lie closer or further along the route. Determining the precise problem location typically requires a return traceroute from the specific hop, which is often unattainable outside of your network.
Using MTR: A Guide
MTR serves as a dynamic alternative to the traceroute program. It combines the functionalities of ping and traceroute, enabling constant polling of a remote server to observe changes in latency and performance over time.
Unlike traceroute, MTR is not typically installed by default on most systems. You can obtain it by executing the following commands.
Ubuntu/Debian:
$ sudo apt-get install mtr
CentOS/Fedora:
$ yum install mtr
Arch:
$ pacman -S mtr
Once installed, you can initiate it by typing:
$ mtr google.com
You will receive output resembling the following:
Output
My traceroute [v0.80]
traceroute (0.0.0.0) Tue Oct 22 20:39:42 2013
Resolver: Received error response 2. (server failure)er of fields quit Packets Pings
While the output may appear similar, the significant advantage over traceroute lies in the constant updating of results. This feature enables the accumulation of trends and averages, offering insights into how network performance fluctuates over time.
Unlike traceroute, where packets may occasionally traverse without issue, even in the presence of intermittent packet loss along the route, the mtr utility monitors for such occurrences by collecting data over an extended period.
Additionally, mtr can be run with the --report option, providing the results of sending 10 packets to each hop.
$ mtr --report google.com
The report appears as follows:
Output
HOST: traceroute Loss% Snt Last Avg Best Wrst StDev
This can be advantageous when real-time measurement isn't imperative, but you require a broader range of data than what traceroute offers.
Traceroute and MTR offer insights into servers causing issues along the path to a specific domain or address. This is invaluable for troubleshooting internal network issues and providing pertinent information to support teams or ISPs when encountering network problems.
This article covers the process of renewing Let’s Encrypt SSL certificates installed on your instance. Please note that it does not apply to Let’s Encrypt certificates managed by Utho for load balancers.
Let’s Encrypt utilizes the Certbot client for installing, managing, and automatically renewing certificates. If your certificate doesn't renew automatically on your instance, you can manually trigger the renewal at any time by executing:
sudo certbot renew
If you possess multiple certificates for various domains and wish to renew a particular certificate, utilize:
certbot certonly --force-renew -d example.com
The "--force-renew" flag instructs Certbot to request a new certificate with the same domains as an existing one. Meanwhile, the "-d" flag enables you to renew certificates for multiple specific domains.
To confirm the renewal of the certificate, execute:
sudo certbot renew --dry-run
If the command executes without errors, the renewal was successful.
Renewing Let's Encrypt certificates doesn't have to be daunting. By following the steps outlined in this comprehensive guide, you can ensure your certificates remain up-to-date and your websites stay secure. Whether it's automating the renewal process or manually triggering it when needed, maintaining SSL certificates doesn't have to be a hassle. With the right tools and knowledge at your disposal, you can keep your online presence protected without any fuss.
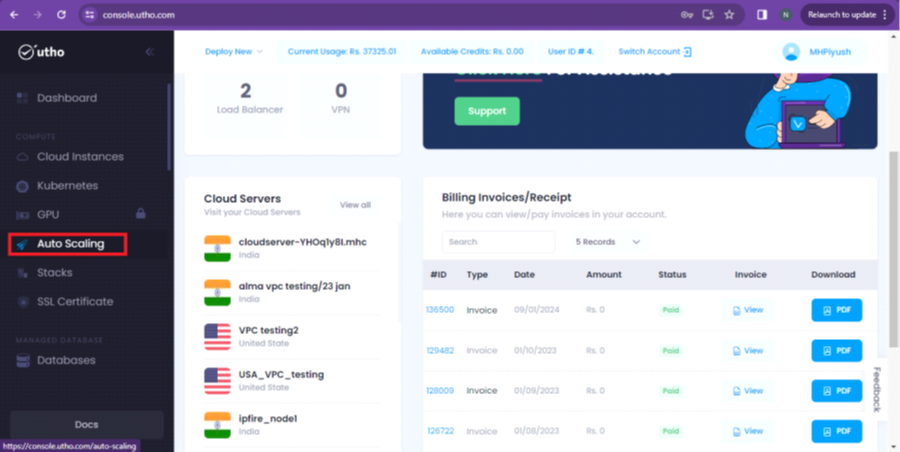
Step 2: Now, click on the Autoscaling option as per the screenshot given below.
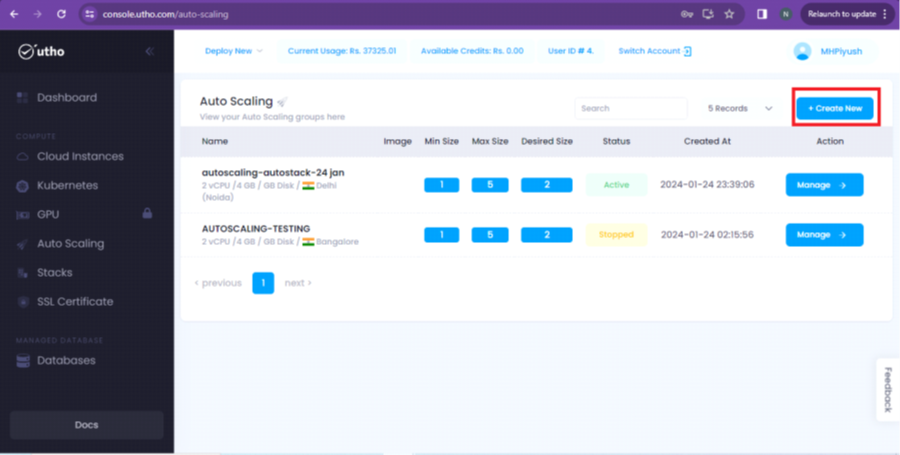
Step 3: You will be redirected to a new page, where we have to select the “Create New” button.
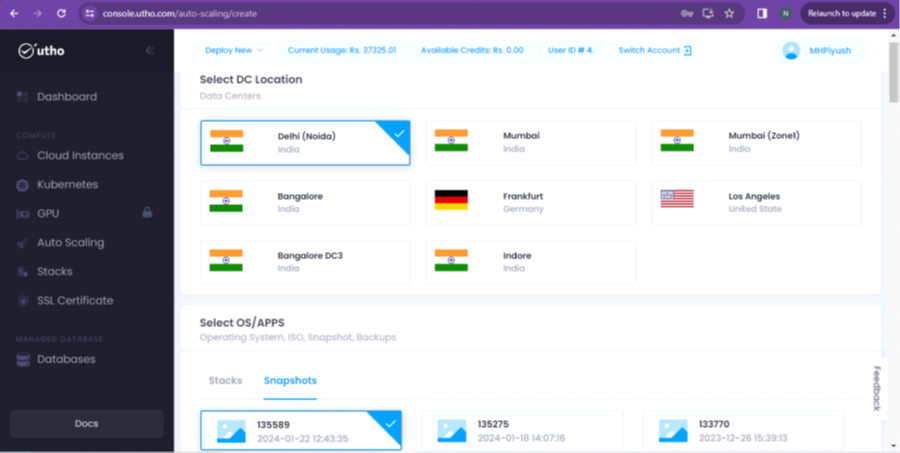
Step 4: Afterward, we will see a new page, where you have to choose a data center location and a Snapshot/Stack (you can attach your own stacks here) as per given in the screenshot.
Step 5: Now, proceed with selecting the configuration of the server.
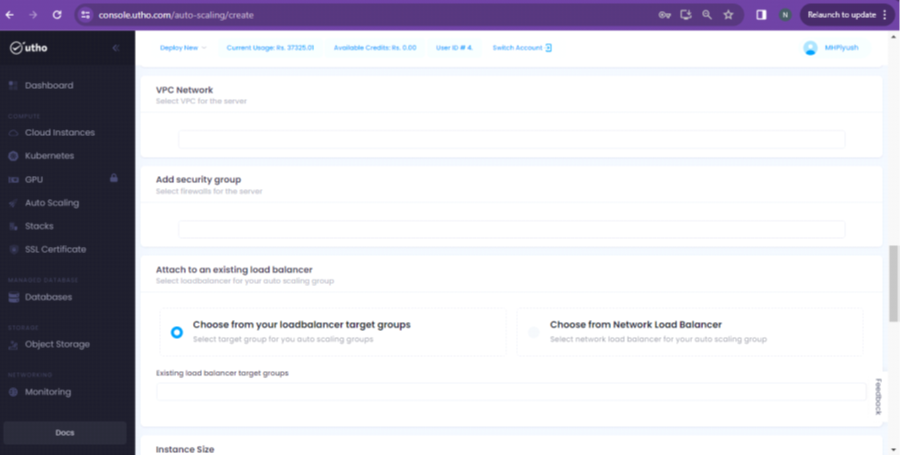
Step 6: In the next step, you can specify a VPC, SECURITY GROUP and LOAD BALANCER as per your requirement.
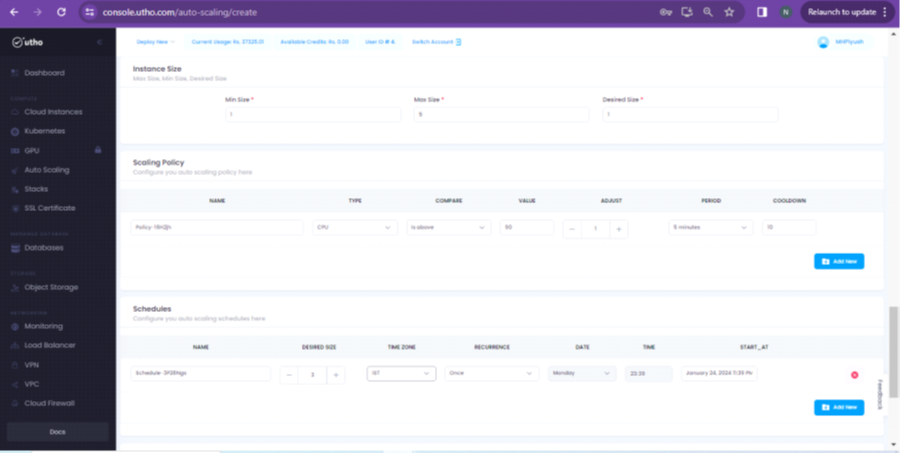
Step 7: Scrolling down on the same page, you will get the option of Instance size, Scaling Policy and Schedules. Please make the changes according to your requirement.
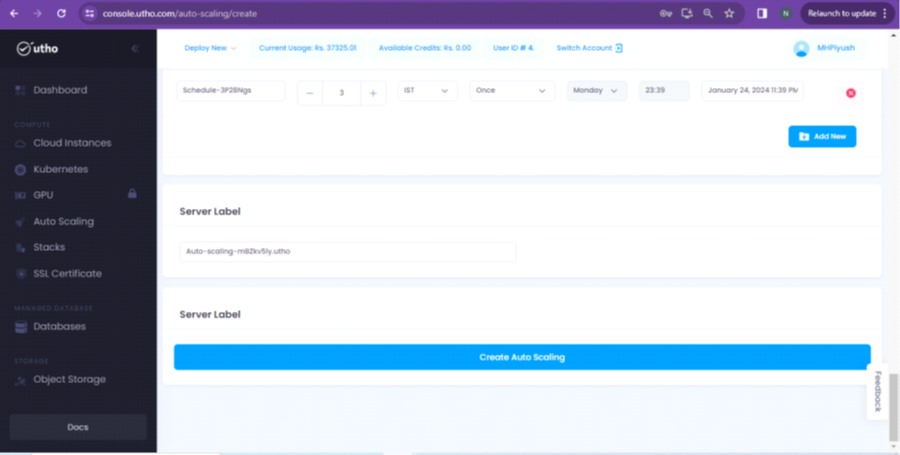
Step 5: In the end, you will get the option to specify the Server label(this will reflect in server name) along with the button of Create Auto Scaling. Please see the screenshot for your reference.
After clicking on “Create Auto Scaling” , the service will be created of selected configuration. We can see the details of the same in the “Auto Scaling” section of the dashboard.
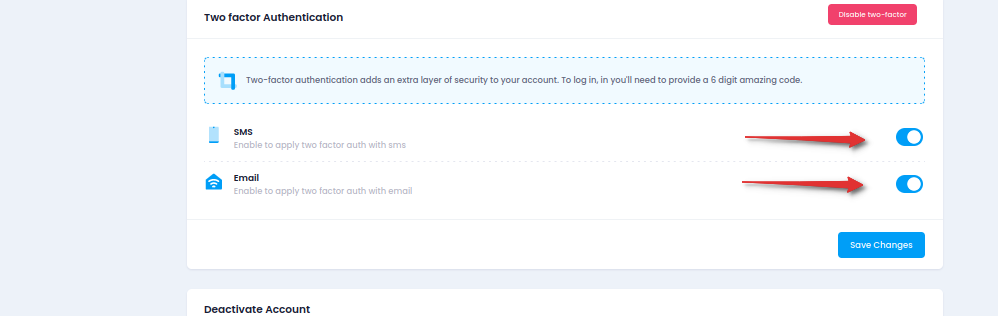
Follow this step-by-step guide to effortlessly enhance the security of your Utho Dashboard account by managing Two-Factor Authentication preferences for mobile and email access.
4.1 Within the Two-Factor Authentication settings, choose whether to enable or disable.
4.2 Select the preferred delivery method(s) for receiving authentication codes.4.3 Ensure that at least one delivery method is chosen to receive 2-factor authentication codes.
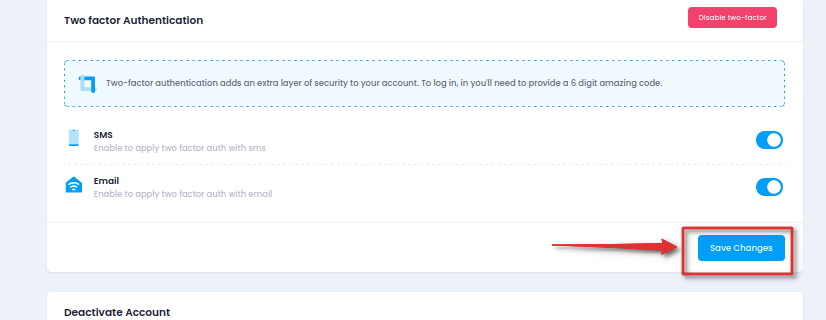
Step 5: Save Configuration Changes
5.1 After adjusting your Two-Factor Authentication settings, locate and click on the "Save Changes" button.
5.2 Verify the successful saving of changes with the confirmation message indicating that the changes have been saved.
Owning your email server proves beneficial for medium-sized enterprises. It allows for centralized traffic control and rule customization, facilitating clear and efficient service management.
This guide demonstrates the installation and configuration of an Ubuntu mail server on a virtual private server also running Ubuntu. While there exist various alternatives and methods for setting up email servers on Linux, we'll focus on this particular approach. Nevertheless, our focus will be on Postfix!
Setting up DNS for an Ubuntu Mail Server: Configuration Guide
Simply adhere to this comprehensive step-by-step guide, and you'll encounter no difficulties while configuring the setup!
Sign in and Upgrade Your Server (Utho): Access the Utho server via SSH. If you encounter any issues. Once logged in, proceed to update your system using the provided command:
apt-get update
Install Bind: In order to set up a DNS server to work with Postfix, we require an additional tool - Bind. Let's proceed with its installation:
sudo apt install bind9
Configure /var/cache/db.test: Now, it's crucial to note that the IP address of our Ubuntu machine is 192.168.250.7. We need to substitute it with the IP address where the installation will take place. For this demonstration, we'll utilize mail.test.com as a Fully Qualified Domain Name (FQDN). Next, we need to establish a new zone for our example. To achieve this, create a new file containing the zone information.
sudo nano /var/cache/bind/db.test
Subsequently, include the following:
$ORIGIN test.com. $TTL 1D @ IN SOA ns1 root( 1 ;serial 1D ;refresh 2H ;retry 2W ;expire 5H ;minimum ); @ IN NS ns1 ns1 IN A 192.168.250.7 mail IN A 192.168.250.7 @ IN MX 5 mail
Keep in mind, it's imperative to replace the IP address with that of your server (Utho) and modify the domain to your preferred one. Press CTRL+O to save the alterations and CTRL+X to exit the nano editor.
4. Add New Zone to Bind Configuration: Prior to enabling the newly created zone, it's essential to review the configuration of the file.
We can now append our new zone to the Bind zone configuration file. Execute the following command:
sudo nano /etc/bind/named.conf.default-zones
Then, insert the new zone:
zone "test.com." { type master; file "db.test";};
Once more, press CTRL+O to save the modifications and CTRL+X to exit.
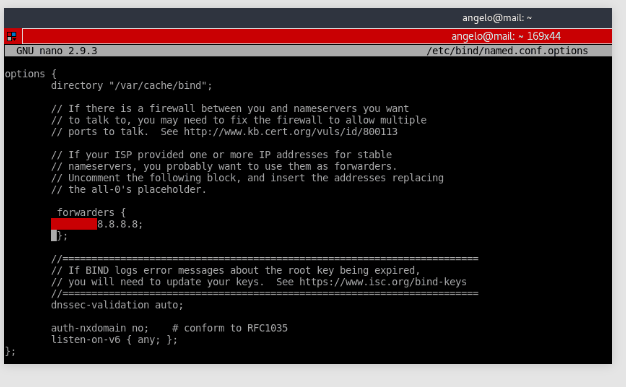
5. Configure /etc/bind/named.conf.options: In the file /etc/bind/named.conf.options, you need to uncomment the forwarders line and incorporate the Google DNS - 8.8.8.8. Simply remove the // symbols, as illustrated in the screenshot below.
sudo nano /etc/bind/named.conf.options
6. Restart Bind: Now, it's time to restart the bind9 service. You can achieve this using one of two commands:
sudo systemctl reload bind9
Or
sudo systemctl restart bind9
Installing and Setting Up a Mail Server on Ubuntu: Complete Guide
We're nearly finished, your Ubuntu email server is almost ready to go live. Here's what you need to do next:
Install Postfix Email Server: Next, let's install Postfix. Postfix is a fast and open-source email server written in C. Use the following command to install it:
sudo apt install postfix
During installation, you'll be prompted to configure the package. Select 'Internet Site' on the first screen.
Next, enter the server name, which in this case is test.com.
While Postfix offers extensive configuration options, for this tutorial, we'll stick with the default settings.
2. Add user: Afterwards, we need to include our user in the 'mail' group:
sudo usermod -aG mail $(whoami)
After that, we need to create the users and include them in the mail group to enable them to send and receive mail. Let's add Gabriel as an example:
sudo useradd -m -G mail -s /bin/bash/ gabriel
Afterwards, we must assign a password to the newly created user:
sudo passwd gabriel
3. Test the Ubuntu Mail Server: Now, let's confirm our setup by sending and receiving an email from the terminal. To do this, we'll install the mailutils package:
sudo apt install mailutils
Then, we'll send an email to the other user's email account, named Gabriel. Type in the subject and message. Once done, press CTRL+D to finish. Begin composing the email with the following command:
Now, let's log into another user account and check the mail utility. After running the 'mail' command, we'll find the email we just sent to the other test user. To access the email, simply enter the number assigned to the mail, such as 1.
To test outbound emails from this user, try sending to another email address:
That's all! You're now able to send emails from your own email server on Ubuntu.
Setting up an email server is relatively straightforward, yet its management can pose some complexity. Linux is often preferred for this task due to its robust security features and efficient resource management.
For larger enterprises, having a pre-configured and fully functional email server solution like Utho's can prove immensely beneficial. Alternatively, hosting your own email server grants you complete control over the service.
Enhancing and sustaining an email server involves continuous refinement and adaptation, constituting a dynamic and time-intensive process.
This article addresses the initial phase of connecting an SSH client to an SSH server, focusing on troubleshooting common network connectivity issues that may arise. It provides insights into identifying these issues, offers solutions for resolution, and recommends additional resources to prevent similar occurrences in the future.
Errors
Hostname Resolution: The majority of resolution errors stem from an inability to map the SSH host reference to a network address. Although this issue is typically DNS-related, the underlying cause may not always be directly related to DNS.
In an OpenSSH client, executing a command such as "ssh [email protected]" might yield an error similar to this:
ssh: Could not resolve hostname ample.com: Name or service not known
In PuTTY, an error window may display text resembling this:
Unable to open connection to ample.com Host does not exist
Below are troubleshooting steps you can follow to address this error: Check the hostname for correct spelling, as typographical errors can occur unexpectedly.
Confirm that you can resolve the hostname on your client machine using the system ping command. Additionally, utilize third-party sites like WhatsMyDns.net to verify beyond your own DNS caching and confirm the results.
If encountering DNS resolution problems at any stage, consider utilizing the cloud VM IP address as a temporary solution, demonstrated by
Connection Timeout: A connection timeout occurs when the client tries to establish a network socket to the SSH server, but the server fails to respond within the specified timeout period.
In an OpenSSH client, executing a command such as "ssh [email protected]" might result in an error similar to this:
ssh: connect to host 202.0.114.0 port 22: Connection timed out
Below are steps you can follow to troubleshoot this error.
Ensure that the instance host IP address is accurate.
Confirm if your network allows connectivity over the SSH port being utilized. Public networks might block port 22 or customized SSH ports. You can verify this by testing other hosts using the same port with a known working SSH server, which can help determine if the problem isn't unique to your cloud VM.
Check the firewall rules to ensure they don't have a default policy blocking cloud VMs, and verify that the port is not restricted to allow connections.
Connection Refused: A "connection refused" error differs subtly from a timeout. In this case, the request is directed to the SSH host, but the host does not successfully accept the request.
In an OpenSSH client, executing a command such as "ssh [email protected]" may yield an error similar to this:
ssh: connect to host 202.0.114.0 port 22: Connection refused
In PuTTY, an error window may display text resembling the following:
Network error: Connection refused
In this scenario, you might encounter the same underlying problem as with connection timeout errors. However, there are additional checks you can perform:
Ensure the correctness of the instances IP address.
Confirm if your network allows SSH port connectivity. Certain public networks might block port 22 or customized SSH ports. You can verify this by testing other hosts using the same port with a known functioning SSH server, aiding in identifying if the issue pertains specifically to your cloud VM.
Check the cloud VM’s firewall rules to ensure they don't employ a default policy blocking cloud VMs and that the port is not restricted to allow connections.
Verify that the service is operational and bound to the intended port.
Solutions
Checking Your Firewall: Firewall configurations can contribute to connectivity issues. If your firewall is configured to block specific ports or services, it may impede your ability to connect.
When adding a firewall rule allowing your local machine's IP address to connect, ensure that your ISP-assigned IP address hasn't changed. If it has, you'll need to update the firewall rule to accommodate the new IP address or address range.The method for checking firewall rules varies depending on the firewall used by your VM instances. Ubuntu servers typically utilize UFW, while CentOS servers often employ FirewallD. If neither is in use, it's likely that iptables is being used.
Familiarize yourself with modifying rules for the firewall your system utilizes. Additionally, determine the port your SSH service is assigned. While the default port is 22, you can verify this in the "Checking the SSH Service Port" section below.
Iptables
For Linux systems not utilizing UFW or FirewallD, use the iptables command with sudo or as the root user to list your firewall rules.
iptables -nL
The following output suggests that there are no rules obstructing SSH traffic:
Ensure that your SSH port is included in the list.
FirewalID
For FirewallD users, utilize the "firewall-cmd" command to list the services.
firewall-cmd --list-services
The output should display the list of services, including SSH (default port 22), indicating that the firewall supports SSH traffic.
dhcpv6-client http ssh
If you're using a custom port for SSH, you can verify it with the --list-ports option. Even if you've created a custom service definition, SSH should still be visible with --list-services.
Checking the SSH Service Status
To ensure SSH connectivity to your Cloud VM, verify that the SSH service is operational. The method for confirming the service's status varies depending on the system.
For older OS versions (Ubuntu 14 and below, CentOS 6, Debian 6), utilize the service command supported by Upstart. On more modern distributions with systemd, use the systemctl command. Red Hat-based distributions (e.g., CentOS and Fedora) refer to the service as sshd, while Debian and Ubuntu refer to it as ssh.
Using systemctl
Likewise, for servers employing systemd (such as CentOS 7), employ the systemctl command to verify the status:
systemctl status sshd
A running service displays output similar to this, with "active (running)" indicated on the "Active:" line.
sshd.service - OpenSSH server daemon Loaded: loaded (/usr/lib/systemd/system/sshd.service; enabled) Active: active (running) since Mon 2017-03-20 11:00:22 EDT; 1 months 1 days ago Process: 899 ExecStartPre=/usr/sbin/sshd-keygen (code=exited, status=0/SUCCESS) Main PID: 906 (sshd) CGroup: /system.slice/sshd.service ├ 906 /usr/sbin/sshd -D ├26941 sshd: [accepted] └26942 sshd: [net]
If the service is not running, the "Active" line will show "inactive" followed by recent journal entries for the service:
sshd.service - OpenSSH server daemon Loaded: loaded (/usr/lib/systemd/system/sshd.service; enabled) Active: inactive (dead) since Fri 2017-04-21 08:36:13 EDT; 2s ago Process: 906 ExecStart=/usr/sbin/sshd -D $OPTIONS (code=exited, status=0/SUCCESS) Process: 899 ExecStartPre=/usr/sbin/sshd-keygen (code=exited, status=0/SUCCESS) Main PID: 906 (code=exited, status=0/SUCCESS)
In this scenario, restart it using systemctl start sshd.
Checking the SSH Service Port
There are two primary methods to determine the port on which the SSH service is operating. One involves inspecting the SSH configuration file, while the other entails examining the running process.
For most systems, the SSH configuration file is located at /etc/ssh/sshd_config. The default port is 22, but any configuration line in this file specifying a Port directive with a numerical value can override it.
You can search for lines like this using grep:
grep Port /etc/ssh/sshd_config
You will observe output similar to this, indicating the port number:
Port 22
If you are certain that the service is operational, you can verify that it is running on the anticipated port using "ss" (executed with sudo or as the root user). Although "netstat -plnt" provides similar output, "ss" is the preferred command for querying socket information from the kernel.
ss -plnt
The desired output should indicate the program name listening on the configured port. For instance, this output indicates that the SSH service is listening on all interfaces, denoted by "*", on port 22.
State Recv-Q Send-Q Local Address: Port Peer Address: Port LISTEN 0 128 *:22 *:* Users:((“sshd” , pid=1493, fd=3)) LISTEN 0 128 :::22 :::* Users:((“sshd” , pid=1493, fd=4))
The interface references "*" and "0.0.0.0" signify all interfaces on the Cloud VM instance. The presence of "127.0.0.1" indicates that the service is not publicly accessible. To default to all interfaces, the relevant sshd_config directive, ListenAddress, should be commented out. Alternatively, it can be set to the public IP address of the Cloud VM instance.
For additional assistance, please consider opening a support ticket. Ensure to include the following details:
The username, host, and port you are attempting to connect to.
The expected authentication mechanism.
The complete error output associated with each stage of the error, including verbose output from the SSH client.
Providing all the diagnostic information mentioned above and specifying where you encounter the issue during the connection attempt can help us quickly understand your needs regarding the issue.
Bash and CMD are important tools in the world of computing. Bash, found in Unix-like systems, helps users efficiently navigate and control their systems using text-based commands. CMD, associated with Windows, offers a similar approach, providing a toolkit for executing commands. Both are crucial for system management, used by administrators, developers, and enthusiasts. Join us as we explore the unique features of Bash and CMD in this brief overview and discover which one is the better command-line interface.
What is Bash?
Bash serves as a UNIX shell and a command-line interpreter, simultaneously playing the roles of both. Recognized as a commonly utilized programming language, Bash supports a range of functions, variables, loops, and conditional statements, resembling features found in several other programming languages. Users can leverage Bash to interpret commands and execute multiple actions.
How does Bash function?
From a technical standpoint, Bash serves as a command interpreter, processing and executing basic system commands like ls or mkdir. This interaction is the primary way of working with Bash. Additionally, there's a second method involving batch files, containing Bash code. Mastering Bash scripting, which involves writing and executing batch files, provides a significant advantage, allowing automation of tasks and the creation of complex system commands.
What are the features of Bash?
Here are fundamental concepts in Bash that every user should acquaint themselves with:
Commands: A command serves as an instruction directing the shell's actions, and it can range from simple to complex, entered into the terminal through typing.
Arguments: Arguments consist of supplementary information provided to a command to alter its behavior, encompassing options, filenames, or other types of data.
Variables: Variables serve as storage for data utilized by the shell or scripts, capable of being assigned values and employed within commands or scripts.
Functions: Functions are employed to group commands together, enabling the execution of specific tasks. They can be invoked either from the command line or within a Bash script.
Redirection: Redirection is the process of directing a command's output to a file or another command. This functionality enables users to save the output to a file or utilize it as input for another command in the command prompt.
Wildcards: Wildcards serve the purpose of matching patterns in filenames or other data, allowing the selection of multiple files or the execution of operations on groups of files.
What are the advantages of using Bash?
The introduction of windows and menus was a significant advancement in computer software development, so why revert to using CLIs like Bash? CLI usage persists due to several distinct advantages over GUIs. Let's delve into some of these advantages.
Enhance your operating system access efficiency: Individuals opt for Bash when they seek to manage their computer or OS without navigating through GUI menus, options, and windows. Additionally, using Bash instead of a GUI is more resource-efficient, as it eliminates the need for the computer to allocate resources to render graphical output. This makes Bash an appealing choice when running multiple programs, a virtual machine, or working with limited computing resources. Input and output with text files: Bash simplifies the creation and editing of text files, including CSVs. Given that text files are among the most prevalent means of storing and processing data, Bash proves to be excellent for tasks such as organizing and refining data, sorting and filtering data, scrubbing and refreshing data.
Automate with ease: Bash facilitates the automation of tasks on your computer, particularly beneficial when your job entails repetitive functions.
What are the primary use cases of Bash?
Key Applications of Bash:
Scripting: Bash scripting empowers users to create scripts, sequences of commands, enabling the automation of repetitive tasks, system administration, and the development of intricate workflows.
File and Directory Management: Bash simplifies file and directory operations, encompassing tasks such as creating, deleting, copying, moving, and renaming files and directories.
Remote Server Management: Bash is commonly employed to establish secure connections to remote servers through SSH (Secure Shell) and execute operations on distant systems.
Software Development: Bash scripts find application in software development workflows, handling tasks such as build automation, deployment, and testing.
What are the primary use cases of CMD?
System Information: CMD provides commands like systeminfo to retrieve detailed information about the system, including hardware and software configurations.
Network Troubleshooting: Commands like ipconfig, ping, and tracert help diagnose and troubleshoot network-related issues.
Task Management: CMD provides commands like tasklist and taskkill to view and manage running processes and applications.
Remote Access: CMD supports remote access and management of other systems using commands like psexec and ssh.
What is CMD (Command Prompt)?
CMD (Command Prompt) serves as a command-line interpreter on Windows operating systems, offering a text-based interface for executing diverse system and application commands, as well as facilitating scripting and automation tasks. It is commonly known as the "Windows command prompt" or simply the "command prompt."
What is the functioning mechanism of Command Prompt?
The command-line interface (CLI) accepts text commands entered through a keyboard. Although CLIs may have varying syntaxes, they generally carry out similar operations. Upon command execution, the computer interprets and performs the specified actions, while the CLI offers user feedback, including error messages or output from the executed commands.
What are the advantages of utilizing a Command Prompt?
Using a command-line interface (CLI) offers numerous advantages, with the most notable being: Speed: The CLI allows for swift execution of commands, enabling the combination of multiple commands into a single line of text for program execution. This efficiency surpasses the navigation through menus in a GUI.
Resources: The CLI demands fewer computing resources for executing commands compared to a graphical interface.
Repetitive Tasks: The CLI proves effective in automating repetitive tasks, allowing the creation of batch files to automate tasks at any specified time.
Power-user: A CLI is well-suited for power users as it grants access to commands not available in a GUI. For instance, certain system-protected tasks cannot be accessed through a GUI.