How to check and analyze packets by tcpdump command

How to check and analyze packets by tcpdump command
Introduction
In this tutorial, we will see how to check and analyze packets by tcpdump command. Tcpdump is a command line utility which is used to capture and analyze packets. It is also used to troubleshoot network issues.
How to install tcpdump.
The installation of tcpdump depends on the operating system you are using.
For Centos 8 , RHEL 8 ,Fedora 34
#yum install tcpdump -y
For debian Based Operating System
# apt install tcpdump -y
We can check tcpdump is installed or not on server
#which tcpdump

check availability of tcpdump
Uses:
Note: For Using tcpdump command Root privileges or any normal user with sudo privilege are required
So if you are not login as root user then use sudo to run tcpdump command
So, Let's start
⇒ To list all port available on server use -D
#tcpdump -D
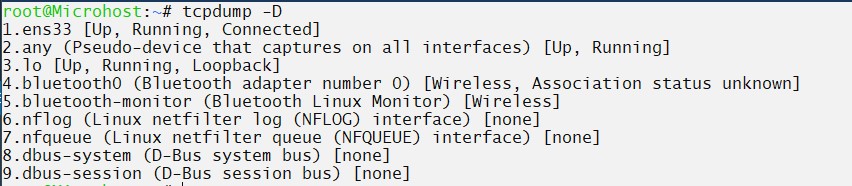
list available ports
⇒ Check traffic on any specific port
tcpdump --interface any
This option is used to capture packets on any specific port at the place of any we can define any port like eth0.
⇒ option -c
tcpdump -c number
-c option is used to define the number of packets to be dumped here n is the number of packets.
Example ``` #tcpdump -c 14
<figure>

<figcaption>
capture only 14 packets
</figcaption>
</figure>
We can also use -i option with -i option
#tcpdump -i ens33 -c5
<figure>

<figcaption>
analyse packet on specific port
</figcaption>
</figure>
⇒ **\-n && -nn**
\-n option is used to disable name resolution
\-nn option is used to disable port resolution
#tcpdump -c5 -n
<figure>

<figcaption>
disable name resolution
</figcaption>
</figure>
#tcpdump -c5 -nn
<figure>

<figcaption>
turn off the port resolutions
</figcaption>
</figure>
⇒ **To filter packets based on protocol**
We can filter packets of any specific protocol
#tcpdump -c200 icmp
⇒ **Filter packets by host**
#tcpdump -i any -c200 src 103.127.30.80
⇒ **Filter packets by port**
#tcpdump -i any c100 port 3330
⇒ **Filter by source IP address**
#tcpdump src 11.121.21.57
⇒ **Filter by destination IP**
#tcpdump dst 103.127.31.50
⇒ **tcpdump with source address and port number**
#tcpdump -i eth0 src 103.127.31.50 and port 80
⇒ **Capture and save packets in file**
tcpdump -w filename.pcap -i any
For reading .pcap file
#tcpdump -r filename.pcap
Here, please note that .pcap file will be a binary file, which cannot be read by vim or less command

⇒ Finding Packet by Network
#tcpdump net 103.127.30.0/24
⇒ **Filter traffic by port range**
#tcpdump portrange 21-30
⇒ **Filter httpd cookies**
#tcpdump -vvAls0 | grep 'Set-Cookie|Host:|Cookie:'
⇒ **Filter by length**
#tcpdump -i eth0 -nn -s0 -v port 80
Here -s0 is snap length,is the size of packet to capture -s0 will set the size to unlimited

⇒ **To display ASCII value**
tcpdump -A -s0 port 80
⇒ **Capture ipv6 traffic**
#tcpdump -nn ip6 proto 6
⇒ **Port Scan**

#tcpdump -nn

⇒ **Capture Start and last packet from any network**
#tcpdump 'tcp[tcpflags] & (tcp-syn|tcp-fin) != 0 and not src and dst net 8.8.8.8'
So that is how you learned how to check and analyze packets by tcpdump command

Thankyou

Also Read: [Deploying and Managing a Cluster on Microhost Kubernetes Engine (MKE)](https://utho.com/docs/tutorial/deploying-and-managing-a-cluster-on-microhost-kubernetes-engine-mke/), [How to Install MongoDB on Debian](https://utho.com/docs/tutorial/how-to-install-mongodb-on-debian/)