How to install Minikube on CentOS 7 and 8
How to install Minikube on CentOS 7 and 8
In this tutorial, we will learn How to install Minikube on CentOS 7 and 8. Minikube is free software that lets you set up a small Kubernetes cluster with a single computer. The software starts up a virtual machine and runs a Kubernetes cluster inside of it. This lets you test directly in a Kubernetes environment.
Prerequisites
- A normal user with SUDO privileges or Super user
- Yum repositories configured to install packages in your CentOS server.
Steps to install Minikube on Centos
Step 1: Update your machine
yum -y update
Step 2: Install EPEL repositories using below command.
yum -y install epel-release
Step 3: Install libvirt packages, dependencies to run Minikube
yum -y install libvirt qemu-kvm virt-install virt-top libguestfs-tools bridge-utils
Step 4: Now run, enable and check the status of libvirt daemon to ensure it is running and installed successfully.
systemctl enable --now libvirtd
systemctl status libvirtd
Step 5: Now, add your any normal user to libvirt group by using usermod command.
usermod -a -G libvirt <normal-username>
usermod -a -G libvirt prabhu      # my normal user
Step 6: Now, append the below mentioned details to the below file.
vi /etc/libvirt/libvirtd.conf
Append contend to above file::
unix_sock_group = "libvirt"
unix_sock_rw_perms = "0770"
Step 7: Restart the libvirtd daemon/ service to reflcet the changes.
systemctl restart libvirtd.service
Download Minikube binary
Step 8: Download and install the minikube binary using the curl and install command as shown below.
curl -LO https://storage.googleapis.com/minikube/releases/latest/minikube-linux-amd64
sudo install minikube-linux-amd64 /usr/local/bin/minikube
Step 9: Check the version installed of your minikube.
minikube version

Minikube install on CentOS
Download Kubectl binary and installed it
Step 10: Download the latest kubectl binary using the below command
curl -LO https://storage.googleapis.com/kubernetes-release/release/`curl -s https://storage.googleapis.com/kubernetes-release/release/stable.txt`/bin/linux/amd64/kubectl
Step 11: Now, make the binary executable, so the it can be run
chmod +x kubectl
Step 12: Move the binary to /usr/loca/bin directory so that it can be run from anywhere of your machine.
mv kubectl /usr/local/bin
Step 13: Check the version installed on your centos machine
kubectl version --client -o json
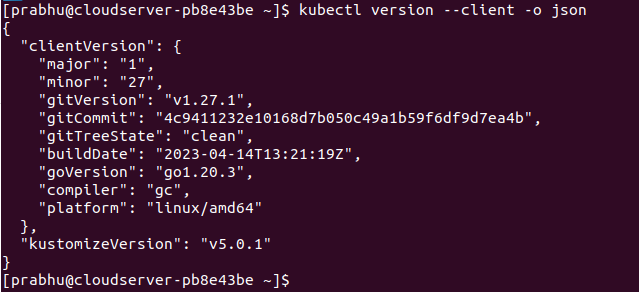
Version of installed kubectl
Install Docker container
Step 14: Now, without, docker environment, you cannot run minikube. Therefore, run the below command to add the repolist to your machine to install Docker.
 yum install -y yum-utils
 yum-config-manager --add-repo https://download.docker.com/linux/centos/docker-ce.repo
Step 15: Install the docker related dependencies to run your minikube.
yum install docker-ce docker-ce-cli containerd.io docker-buildx-plugin docker-compose-plugin
Step 16: Now, run the below command to enable and start the docker service instantly
systemctl enable --now docker
Step 17: Check the docker running version.
docker version
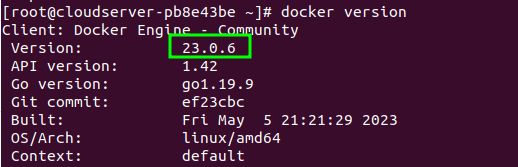
Docker installed on Centos
Step 18: Now, add your normal user( user which is added to libvirt group in earlier step) to the docker group as well.
usermod -aG docker prabhu
Step 19: Now, switch to that user and run the minikube with driver docker as a default driver.
su - prabhu
minikube start --driver=docker
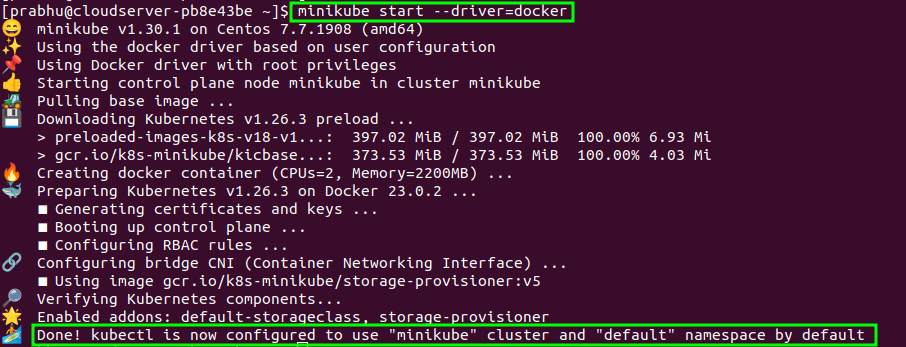
Minikube installed and running on centos
And, that's how, you have learnt how to install Minikube on CentOS 7 and 8.