How To Install and Configure pgAdmin 4 on Ubuntu 22.04

How To Install and Configure pgAdmin 4 on Ubuntu 22.04
Introduction
In this tutorial, you will learn how to install and configure PgAdmin 4 on Ubuntu 22.04. pgAdmin is an open-source tool for managing and developing PostgreSQL and other database management systems that work with it. It was made with Python and jQuery, and it has all of the features of PostgreSQL. You can do everything with pgAdmin, from writing simple SQL queries to keeping an eye on your databases and setting up more complex database architectures.
Prerequisites
- A super user( root ) or any normal user with SUDO privileges.
- Configured Nginx reverse proxy for
http://unix:/tmp/pgadmin4.sock. - PostgreSQL installed on your server.
- Python 3 and
venvinstalled on your server. Read here for more information about this.
1. Installing pgAdmin and its Dependencies
Step 1: As of this writing, pgAdmin 4 is the most recent version, while pgAdmin 3 is the most recent version that can be found in the official Ubuntu repositories. But pgAdmin 3 is no longer supported, and the people who run the project suggest that you use pgAdmin 4. In this step, we'll talk about how to install the latest version of pgAdmin 4 in a virtual environment (which is what the project's development team recommends) and how to use apt to install its dependencies.
apt update
Step 2: Next, you need to install the following. These include libgmp3-dev, which is a library for multiprecision arithmetic, libpq-dev, which has header files and a static library that make it easier to talk to a PostgreSQL backend, and so on.
apt install libgmp3-dev libpq-dev
Following this, create a few directories where pgAdmin will store its sessions data, storage data, and logs:
mkdir -p /var/lib/pgadmin4/sessions
mkdir /var/lib/pgadmin4/storage
mkdir /var/log/pgadmin4
Step 3: Then, change who owns these directories to your user and group that is not root. This is necessary because they are currently owned by your root user, but we will install pgAdmin from a virtual environment owned by your non-root user, and the installation process involves creating some files in these directories. After the installation, we will change the ownership to the www-data user and group so that it can be served to the web:
Next, open up your virtual environment. Find the directory where your programming environment is and then turn it on. We'll go to the environments directory and turn on the my env environment by using the same naming rules as the prerequisite Python 3 tutorial:
cd environments/
source my_env/bin/activate
Step 4: After turning on the virtual environment, it would be smart to make sure that your system has the most recent version of pip. Run the following command to bring pip up to the latest version:
python -m pip install -U pip
Step 5: Now install pgadmin using python
python -m pip install pgadmin4==6.10
Step 6: Next, install Gunicorn, a Python WSGI server that will be used with Nginx to serve the pgadmin web interface later in the tutorial:
python -m pip install gunicorn
That's all there is to installing pgAdmin and the things it needs. Before you can connect it to your database, you'll need to make a few changes to how the programme is set up.
2\. Configuring pgAdmin 4
Even though pgAdmin has been installed on your server, you still need to take a few steps to make sure it has the permissions and settings it needs to serve the web interface correctly.
The main configuration file for pgAdmin, config.py, is read before any other file. Its contents can be used as a guide for other configuration settings that can be set in pgAdmin's other config files, but you shouldn't change the config.py file itself to avoid unexpected errors. We'll make some changes to the configuration in a new file called config local.py. This file will be read after the main one.
Step 7 Create this file now using your preferred text editor. Here, we will use vi
vi my_env/lib/python3.10/site-packages/pgadmin4/config_local.py
In your editor, add the following content:
LOG_FILE = '/var/log/pgadmin4/pgadmin4.log'
SQLITE_PATH = '/var/lib/pgadmin4/pgadmin4.db'
SESSION_DB_PATH = '/var/lib/pgadmin4/sessions'
STORAGE_DIR = '/var/lib/pgadmin4/storage'
SERVER_MODE = True
Notice that each of these file paths point to the directories you created in Step 1.
And now save the file and exit.
Step 8: With those configurations in place, run the pgAdmin setup script to set your login credentials:
python my_env/lib/python3.10/site-packages/pgadmin4/setup.py
After you run this command, you will see a prompt asking for your email address and a password. When you access pgAdmin later, these will be your login information, so make sure to remember or write down what you put here:
After that, pgAdmin is all set up. But your server isn't yet serving the programme, so it's still not available. To fix this, we will set up Gunicorn and Nginx to serve pgAdmin so that you can use a web browser to get to its user interface.
Starting Gunicorn and Configuring Nginx
Gunicorn will be used to make pgAdmin work as a web application. But since Gunicorn is an application server, it can only be used locally and can't be accessed over the internet. You will need to use Nginx as a reverse proxy to make it available from afar.
After you've done what you needed to do to set up Nginx as a reverse proxy, this will be in your Nginx configuration file:
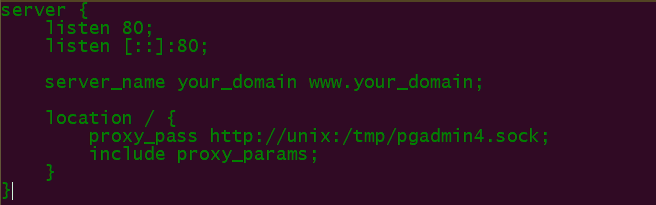
This reverse proxy configuration makes it possible for your local browser to connect to your Gunicorn server. With the pgAdmin programme, you can start up your Gunicorn server:
vi gunicorn --bind unix:/tmp/pgadmin4.sock --workers=1 --threads=25 --chdir ~/environments/my_env/lib/python3.10/site-packages/pgadmin4 pgAdmin4:app
With Gunicorn as an application server and your Nginx reverse proxy making it possible to access it, you can now use your web browser to access pgAdmin.
4\. Accessing pgAdmin
Step 9: Open your favourite web browser on your own computer and go to your server's IP address:
http://Server-ip_Or-domain-name
In this tutorial, you have learnt How To Install and Configure pgAdmin 4 on Ubuntu 22.04.
Also Read: How to install Cockpit on Fedora Server, How to install Apache on CentOS 7